 Rohman
Someone asks you to send "the photos as a PDF." Maybe it's a landlord who wants the move-out pictures, or an insurance claim form that takes exactly one attachment. You AirDrop the photos to your laptop, and they arrive as IMG_4471.HEIC. Windows won't preview them. The upload form rejects them. And the first converter Google offers wants you to send pictures of your kitchen to a server you know nothing about.
Quick answer: to convert HEIC to PDF without uploading anything, open HEIC to PDF in any modern browser, drop in the photos, drag them into order, pick Letter or A4 if the PDF will be printed, and download. The photos are decoded inside your browser tab. Location data is stripped by default.
That is the whole job. The rest of this post is about the parts that bite, starting with the extra JPG step most guides tell you to take and ending with what your photos quietly carry into a PDF you're emailing to a stranger.
Why your iPhone saves HEIC in the first place
Since iOS 11, the iPhone camera has saved photos as HEIF, a container format, with the image compressed by HEVC (the same codec as H.265 video). Apple calls the combination HEIC. The pitch, in Apple's own words, is that HEIF offers "better compression than JPEG," so photos "use less storage space on your devices and iCloud Photos, while preserving the same visual quality."
That's true, and on the phone it's a good deal. The cost lands everywhere else.
In browsers, HEIC is effectively a Safari format. According to caniuse, Safari 17 and later decode it, and Chrome, Firefox and Edge don't render it at all on desktop. Chrome on Android 10+ is the one exception, because it borrows the operating system's decoder. On Windows, the Photos app needs Microsoft's HEIF Image Extensions, and many files also need the separate HEVC Video Extensions, which is a paid listing in the Microsoft Store (Windows Central walks through it). Linux and older Macs are a coin toss.
So a HEIC photo is excellent inside Apple's walls and a support ticket outside them. PDF is the opposite: every phone, laptop, printer driver and email client opens it without thinking.
The detour most guides send you on
Search "HEIC to PDF" and the most common advice is a two-step: first convert the HEIC files to JPG, then convert the JPGs to PDF. Sometimes it's three steps, with an upload in the middle.
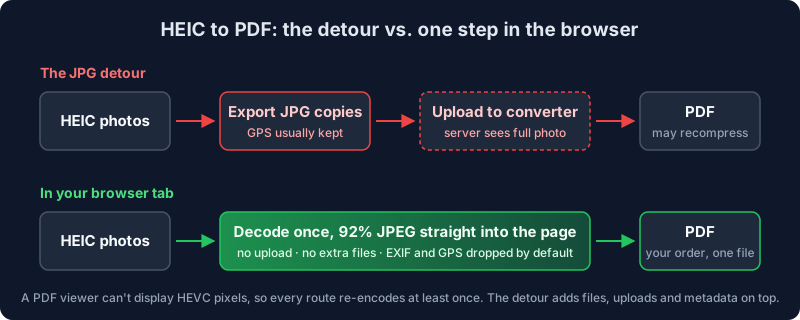
The detour has real costs, and none of them are dramatic on their own:
- Every photo becomes two files. You now have a folder of HEICs and a folder of JPGs with the same names, and the next person to open that folder has to guess which is which.
- The JPG export often keeps the metadata. Many converters copy EXIF straight across, so the GPS coordinates ride along into the JPG and then into whatever you build from it.
- An upload converter sees everything. Server-side tools receive the full-resolution photo, metadata included. What happens to it afterwards is a line in a privacy policy.
- Some pipelines compress twice. HEIC to JPG is one lossy encode. A PDF tool that re-compresses the images to shrink the file is a second one.
None of this means JPG is bad. It means the intermediate step buys you nothing. A PDF can't hold HEVC-compressed pixels in any way a normal viewer understands, so something has to decode the HEIC and re-encode it. The only questions are where that happens, how many times, and what gets carried along.
What happens when you do it in the browser
Here is exactly what HEIC to PDF does, because "runs locally" is a claim you should be able to check.
When you drop a photo in, the tab decodes it with libheif compiled to WebAssembly (via the open-source heic2any library). The decoded image is encoded once as a JPEG at 92% quality, and that JPEG is embedded into the PDF page as-is, with no second compression pass. One lossy step, at a quality level where you'd need to zoom in hard on a flat blue sky to find anything.
I'll be straight about that: this is not lossless. If you need the original HEIC pixels bit for bit, keep the HEIC files. For a PDF someone will read, print or file, 92% JPEG is visually the same photo.
Nothing is uploaded at any point. You can load the page, turn off Wi-Fi, and convert a whole album. That's the practical proof, and it's a better test than any privacy policy.
A few behaviors worth knowing before you start:
Live Photos and bursts. A Live Photo or burst can arrive as a HEIC holding several images. The converter takes the first one, the key frame your Photos app shows as the still. The motion part of a Live Photo is video, and a PDF page can't hold video.
Only HEIC goes in. If you drop a mix of HEIC and JPG files, the tool keeps the HEIC ones and ignores the rest. For JPG, PNG or WebP, use Image to PDF, or read the JPG to PDF guide for the page-sizing details.
Page size matters more than you'd think. The default, Fit to Photo, makes each page the photo's own size, converting pixels to points at 96 per inch. A 12-megapixel iPhone photo (4032 x 3024 pixels) becomes a page 42 inches wide. That looks fine on a screen and is useless on a printer. If anyone will print this PDF, choose Letter or A4.
Your photos know where you live
This is the part people skip, and it's the reason I'd rather you not use a random upload converter for this particular job.
Every iPhone photo taken with Location Services on carries EXIF metadata: camera model, lens, exposure, the exact capture time, and the GPS coordinates of where you were standing. Apple's own personal safety guide puts it plainly: when you share photos that include location metadata, "the people you share them with may be able to access the location metadata and learn where it was taken."
Pictures of your apartment for a landlord, or of your car parked in your driveway for an insurer: the file tells the recipient where each photo was taken, and they don't have to try hard to see it.
The iPhone has its own fix. In Photos, select the pictures, tap Share, tap Options, and turn off Location. That works when you share straight from the phone. It doesn't help once the HEIC files are already on a computer.
In HEIC to PDF, metadata is off by default. The browser's decode step throws the EXIF block away on its own, and the tool doesn't put anything back unless you ask it to. The PDF gets pixels and nothing else.
Sometimes you want the metadata. An insurance adjuster may actually want the capture date, or you're archiving family photos and the dates are the point. Turn on Keep photo metadata (EXIF) and the tool reads the original EXIF block out of the HEIC file and splices it into each embedded JPEG, unchanged. That includes GPS, so turn it on for the archive and leave it off for the landlord.
Step by step: HEIC to PDF on any computer
The steps are the same on Windows, macOS, ChromeOS and Linux, because the work happens in the browser, not the operating system.
- Get the files off the phone. AirDrop to a Mac, iCloud Photos on the web, a USB cable, or a cloud drive. If you use a cable to a Windows PC, the iPhone's Settings > Photos > Transfer to Mac or PC option decides whether you get HEICs (Keep Originals) or JPGs (Automatic).
- Open HEIC to PDF and drop the photos in, or click to pick them. Each one decodes in the tab, so a big album takes a moment on an older laptop.
- Put them in order. Drag thumbnails on desktop. On a phone or tablet, use the move earlier and move later arrows. Each photo becomes one page, top to bottom.
- Pick a page size. Fit to Photo for on-screen viewing. Letter or A4 for anything that might be printed, and then Advanced Options gives you portrait, landscape or auto orientation and a margin of up to one inch.
- Choose one PDF or several. With two or more photos you can make a single combined PDF, or one PDF per photo, downloaded together as a ZIP.
- Decide on metadata. Leave Keep photo metadata off unless the recipient needs dates or you're archiving.
- Convert and download. A single photo keeps its own filename (
IMG_4471.pdf). A batch comes out asheic-photos.pdf, which you can rename before downloading.
If the PDF is headed for an email attachment limit, run it through Compress PDF afterwards. If you're assembling a bigger packet, say photos plus a signed form, Merge PDF stitches the files together, also without uploading.
When you should skip the PDF entirely
A PDF is the right container when a person or a form wants one document. It's the wrong one when the photos are the product.
If a photographer, a print shop or a family member wants the pictures to edit or print at full quality, send the HEIC files, or turn on Most Compatible under Settings > Camera > Formats so future photos are JPG from the start. If the recipient is on an Apple device, HEIC is already the best format they could get.
The PDF wins when order matters, when an upload form accepts only one file, when the person on the other end is on a Windows laptop from 2019, or when you want to be sure what the file says about you.
Frequently asked questions
How do I convert HEIC to PDF on Windows?
Open HEIC to PDF in Chrome, Edge or Firefox and drop the files in. You don't need the HEIF or HEVC extensions from the Microsoft Store, because the decoder ships inside the web page itself and runs in the browser tab.
Can I combine several HEIC photos into one PDF?
Yes. That's the default. Drop in as many photos as you need, drag them into order, and they become one PDF with one photo per page. If you'd rather have a separate PDF per photo, pick Separate PDFs and you get them all in a single ZIP.
Does converting HEIC to PDF reduce quality?
Slightly, and only once. The photo is decoded and saved as a 92% quality JPEG inside the PDF, with no second compression pass. On a screen or a print you won't see a difference. If you need the original pixels exactly, keep the HEIC files alongside the PDF.
Does the PDF include my photo's GPS location?
Not by default. The metadata, GPS included, is dropped unless you turn on Keep photo metadata (EXIF). If you turn it on, the original EXIF block is copied into the PDF unchanged, location and all.
Should I convert HEIC to JPG first?
There's no reason to. Converting to JPG first gives you a second set of files, often keeps the GPS data, and adds a step. Going straight from HEIC to PDF does the one necessary re-encode and nothing more.
What happens to Live Photos?
The still frame, the one your Photos app shows, becomes the PDF page. The few seconds of motion are video, which a PDF can't hold.
The short version
HEIC is a good format stuck in a small world. Getting it out shouldn't mean handing your photos, and your home address, to a server. Decode once, in your own browser, keep the metadata only when you mean to, and send one clean file.
Convert your HEIC photos to PDF right in your browser. Nothing gets uploaded.