 Rohman
You have photos, someone needs a PDF. Most JPG to PDF converters will either produce a 55-inch-wide page from a phone photo or upload your GPS-tagged images to a server in a country you can't identify.
It's one of the most common PDF operations and one of the easiest to screw up.
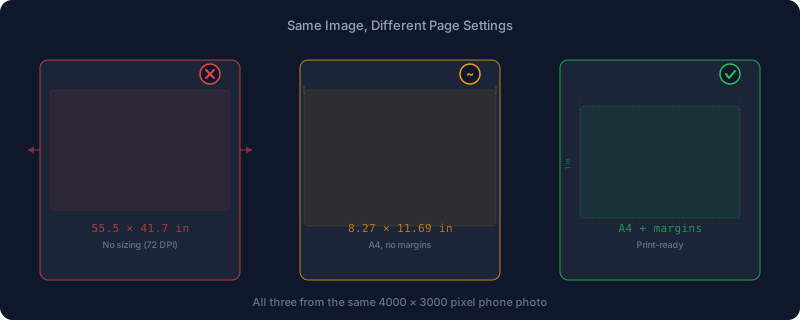
Quick answer: for printing, choose A4 or Letter as the page size, keep Fit to Page selected, and set a margin around 18-36 points. Left at the PDF format's raw default of 72 DPI, a 4000-pixel phone photo becomes a page nearly 56 inches wide instead.
The Default Behavior Is Wrong
The obvious approach: create a page the size of the image in pixels, place the image on it.
A standard 12-megapixel phone photo is 4000 x 3000 pixels. At PDF's default 72 DPI, that's a page 55.5 x 41.7 inches. Nearly 5 feet wide. Your viewer scales it down so it looks fine on screen. Try printing on A4 and you'll get a tiny corner of the image. Or your printer gives up.
This isn't specific to one camera resolution — it's what happens to any image once the page size is derived straight from pixel count instead of a real paper size. A few common ones, worked out the same way:
| Source | Pixel dimensions | Page at 72 DPI | Page at 300 DPI |
|---|---|---|---|
| Phone screenshot | 1080 x 1920 px | 15.0 x 26.7 in | 3.6 x 6.4 in |
| Older 8 MP phone camera | 3264 x 2448 px | 45.3 x 34.0 in | 10.9 x 8.2 in |
| Standard 12 MP phone camera | 4000 x 3000 px | 55.6 x 41.7 in | 13.3 x 10.0 in |
| High-res 48 MP phone camera | 8000 x 6000 px | 111.1 x 83.3 in | 26.7 x 20.0 in |
Screenshots trip people up in the same way photos do — nobody expects a screen capture to print at over two feet tall, but the pixel math doesn't care what the source was.
Getting it right means understanding page sizing and DPI. Margins matter too.
What Good Conversion Looks Like
Page Sizing
Pick a standard paper size before you convert. A4 (210 x 297 mm) covers most of the world; its dimensions come from ISO 216, the international paper-size standard built on a fixed aspect ratio so every size in the series folds evenly into the next (Wikipedia: ISO 216). Letter (8.5 x 11 in) covers the US and Canada. If the PDF is strictly for screen viewing, "Original Size" works, where the page matches the image's pixel dimensions exactly — one pixel to one point, which is a fine mapping for a screen and a bad one for a printer. For anything that might be printed, pick one of the two standards instead, or Legal (8.5 x 14 in) if that's what the destination expects.
DPI and Resolution
DPI controls how large the image appears on the page. That same 4000-pixel-wide photo is 13.3 inches at 300 DPI, or 55.5 inches at 72 DPI — the math is just pixel count divided by DPI. For screen viewing, 72-150 DPI works. For print, 200-300 DPI. Printers also can't resolve endless extra detail: professional imaging guidance treats 300 PPI as the practical ceiling for high-quality print output, and pushing higher mostly just enlarges the file rather than adding visible sharpness (Adobe).
DPI can't add detail that isn't there. An 800 x 600 pixel image will look blurry on a full A4 page no matter what settings you use — raising the DPI number just tells the page to draw the same pixels smaller, it doesn't invent new ones.
Margins
Without margins, images bleed to the page edge. Most consumer inkjet and laser printers can't print all the way to the paper edge anyway — unprintable borders across current Canon, Epson, HP, and Brother models run from about 3 mm to a bit over 6 mm depending on the model and paper size (manufacturer specs compiled here), so a zero-margin export still gets clipped on real hardware. Standard document margins by convention run about 1 inch (72 points). OxygenPDF's margin slider runs from 0 points (full-bleed, fine for screens) up to 72 points in 4-point steps, defaulting to 36 points — half an inch, a reasonable middle ground for most printers.
Your Photos Carry More Than Pixels
Every JPEG from a phone or digital camera can embed EXIF data:
- GPS coordinates accurate to a few meters (photos taken at home reveal your address)
- Timestamps, camera make and model, and sometimes a thumbnail preview generated at capture time
- On dedicated cameras more than phones, a body serial number — the EXIF spec does define a serial-number field (BodySerialNumber, tag 0xA431), but it's populated far more consistently by professional and prosumer camera bodies than by phone cameras, which mostly stick to GPS, timestamp, and a make/model string rather than a per-unit serial
That thumbnail is worth a second look: some editing tools regenerate it when you crop or edit a photo, and some don't, so an EXIF-embedded thumbnail can occasionally still show the original, uncropped frame after the visible image has been trimmed.
Upload to an online converter and all of it goes along. The server gets your GPS coordinates, device and timestamp data, and the image itself. Even if the service isn't harvesting this data on purpose, it sits on their infrastructure during processing.
Does Converting to PDF Strip This Data?
Not automatically, and not always the same way. It depends on the source format. A JPEG embedded into a PDF keeps its original file bytes — including any EXIF block — completely intact; nothing about the conversion re-encodes or inspects that data, it just gets carried into the page as part of the image stream. A PNG, by contrast, gets decoded to raw pixel data and re-compressed losslessly on the way in, which strips whatever metadata the PNG happened to carry.
That distinction matters if metadata removal is the actual goal, not just avoiding an upload. OxygenPDF's own Sanitize PDF tool clears the PDF's own metadata fields — title, author, subject, keywords — and can drop annotations and embedded scripts, but that operates on the PDF's metadata dictionary, not on bytes already baked into an embedded image stream. It won't reach inside a JPEG's EXIF block once that block has ridden along into a page. If the goal is a document with no trace of GPS or timestamp data, strip the photo's metadata before conversion — most phone OS photo-sharing options and desktop image editors have a "remove properties" or "strip metadata" step — rather than assuming the PDF step handles it.
The risk scales with what you're converting:
- Home photos with embedded addresses
- Photos of children with location and timestamp data
- Identity documents, passports, medical records (for an ID copy, print both sides on one page instead)
- Workplace photos with proprietary information visible
Client-side conversion solves the transmission half of this problem — nothing you drop into the tool travels to a server, the same reasoning that applies to every local-first tool in this toolkit. It doesn't retroactively clean metadata that was already sitting in the photo; that's the separate step described above.
Converting with OxygenPDF
- Open the JPG to PDF tool.
- Drop your images in. The upload button's file picker offers JPG, JPEG, or PNG; dragging files straight onto the drop zone isn't limited to those two formats the same way (more on that below).
- Pick a page size: Original Size (the default — matches each image's pixel dimensions, good for screens), A4, Letter, or Legal.
- Choosing anything other than Original Size reveals two more controls: Image Sizing (Fit to Page, Fill Page, or Center) and, under Advanced Options, Page Orientation (Auto, Portrait, Landscape), a Page Margin slider, and an Image Quality slider.
- On a phone, these settings open automatically in a bottom sheet the moment your first photo finishes loading — no extra tap needed to find them.
- Multiple images? Drag to reorder before converting. They all land in a single PDF in the sequence you set.
- Click convert. The PDF downloads automatically once it's ready.
Runs locally. No upload, no server, no account.
If the finished PDF is heavier than you expected — a batch of PNGs adds up fast — compress it afterward rather than re-converting at a lower quality.
Batch Conversion
Single photo conversion is trivial. Batch conversion, taking 20 or 100 images into a well-formatted multi-page PDF, is where most tools fall apart.
What to look for:
- Drag-and-drop reordering so pages end up in the right sequence
- Consistent page sizing across images with different dimensions
- Orientation auto-detection (landscape photos on landscape pages, portrait on portrait) — this is evaluated per photo, so a batch that mixes vertical and horizontal shots doesn't force everything into one orientation
- Progress feedback, because 50 high-resolution images take real time to process, and because every image loads fully into memory before it's embedded, a very large batch on an older or memory-constrained device will run noticeably slower than the same job on a newer one
Some common uses:
Receipt scanning. Photograph a week of receipts, convert to one PDF for expense reporting. A single PDF is easier to attach and review than a folder of loose photos, which many expense-reporting workflows expect anyway.
Photo albums. Pick 30-100 photos from an event, arrange them, produce a shareable PDF. You control the layout and it costs nothing.
Document submission. Photograph certificates or ID documents, convert to PDF for government portals, university applications, job postings.
Field reports. Construction sites, property inspections, equipment audits. Photos on-site, compiled PDF before you leave. If the finished report needs a cover page or narrative text ahead of the photos, merge the two PDFs together afterward rather than trying to build both at once.
Quality Settings Worth Knowing
What Actually Happens to Each Format
The Image Quality slider doesn't touch every file the same way, and knowing which files it actually affects saves you from tuning a setting that does nothing.
- JPEG or JPG source: embedded byte-for-byte, exactly as it was in the original file. No re-encoding happens, so the quality slider has zero effect on it — whatever compression the photo already had is what ships in the PDF.
- PNG source: decoded and re-embedded losslessly. It stays a PNG internally; the tool never converts it to JPEG. The quality slider doesn't touch it either.
- Anything else your browser can decode — WEBP, GIF, BMP, and similar, dropped directly onto the drop zone rather than picked through the Browse button — gets drawn onto a canvas and re-encoded as JPEG at whatever the quality slider is set to. This is the one case where the slider actually changes the output.
OxygenPDF's slider runs from 70% to 100%, defaulting to 92%. In general JPEG-compression terms:
- 92-100%: indistinguishable from the source. Barely any size reduction.
- 80-91%: slight loss visible only at high zoom. Meaningfully smaller files.
- Below 80%: compression artifacts start becoming visible around edges and fine detail, more so as the number drops further.
Stay above 80% for photos going through that re-encode path. For documents with text, keep the source as PNG so it never touches a lossy re-encode at all.
PNG vs. JPEG vs. Everything Else
PNG is lossless and stays that way through this tool — screenshots, graphics, anything with sharp text edges should be a PNG going in, since it comes out with no compression artifacts around the text regardless of any slider position. JPEG sources are embedded exactly as they arrived, artifacts and all, so a heavily compressed JPEG doesn't get any worse, but it also doesn't get any better. Everything else funnels through the canvas re-encode path above, which is the only place the quality setting has a real job to do.
Common Problems and Edge Cases
HEIC photos from an iPhone. This tool takes JPG and PNG, so a raw .heic file belongs in HEIC to PDF instead. That one ships its own HEIC decoder, so it works the same in Chrome, Firefox and Safari, and it strips location data unless you ask it not to. Converting HEIC to PDF covers it in detail. For PNG, BMP, GIF, WebP and SVG, use Image to PDF.
A scan that's already at 300 DPI. Original Size doesn't read any resolution metadata your scanning software embedded — it maps pixels to points 1:1 regardless of what DPI the file claims, exactly the same 72-DPI-equivalent behavior that makes phone photos oversized. A 300 DPI scan of a Letter page is roughly 2550 x 3300 pixels, which under Original Size becomes a 35.4 x 45.8 inch PDF page. Pick Letter or A4 instead of Original Size for scanned documents, the same rule that applies to camera photos.
Screenshots. Same math as a photo, different source. A 1080 x 1920 screenshot at Original Size is a 15 x 26.7 inch page — nobody printing a screenshot wants that, so treat it like any other photo and pick a real paper size.
Very large batches. Nothing here is uploaded, which is the point, but it also means your device is doing all the decoding and re-encoding work. A handful of photos processes in a couple of seconds; a hundred high-resolution images will visibly take longer and use more memory, particularly on an older phone.
Frequently Asked Questions
Does converting a JPG or PNG to PDF reduce image quality?
No, not for those two formats specifically. JPEGs are embedded byte-for-byte with no re-encoding, and PNGs are re-embedded losslessly. The Image Quality slider only affects other formats — WEBP, GIF, and similar — that get canvas-decoded and re-encoded as JPEG during conversion, which is the one path where compression choices actually matter.
What page size and DPI should I use for a printable PDF?
A4 or Letter, whichever your recipient's country uses, with Fit to Page selected. For DPI, treat 200-300 as the useful range for print — much lower and the image looks soft, much higher and you're just inflating the file without adding visible detail. Original Size is fine only if the PDF will stay on a screen.
Does converting a photo to PDF remove its GPS location and other metadata?
Not for JPEGs. The original file bytes, EXIF block included, are embedded into the PDF unchanged, so GPS coordinates and timestamps travel with it. PNGs lose their metadata as a side effect of being re-encoded losslessly, but that's incidental, not a deliberate privacy feature. Strip metadata from the photo beforehand if that's the actual goal.
Can I combine JPG and PNG files in the same PDF?
Yes. Each image in a batch is handled on its own terms — JPEGs embedded as-is, PNGs re-embedded losslessly — so a mixed batch of both formats converts into one PDF with each page keeping its own format's characteristics. Order is whatever you set by dragging before you convert.
Will HEIC photos from an iPhone work?
Use HEIC to PDF for those. It decodes HEIC inside the page, so it works in any modern browser, not just Safari, and it turns a batch of iPhone photos into one PDF without uploading them. The HEIC to PDF guide walks through page sizes and what happens to the photo's GPS data.
Can I convert JPG to PDF from my phone?
Yes. The tool runs the same in a mobile browser as on desktop, and the settings panel opens automatically as a bottom sheet once your first photo loads, so there's no separate menu to hunt for on a small screen.
Wrapping Up
With the right tool, this takes 30 seconds. Page sizing, orientation, margins all handled. The real question is whether your photos leave your device during the process — and, separately, whether the metadata already inside them travels along too, which is a question the conversion step alone doesn't answer for you.
Need to go the other direction, turning PDF pages back into image files? Converting PDF to JPG covers that.
Convert your images to PDF locally in your browser.